This page is about setting up an multiboot system: installing multiple operating systems on one computer. This could be a combination of Windows 98, Windows XP, Windows Vista and/or one of the many other operating systems (like a Linux distribution). A bootmanager is used to show a boot menu to let the user choose between the installed operating systems. Thanks to this boot menu, it is simple to boot every operating system.
Multiboot system with similar or different Windows versions
Since the introduction of Windows Vista, multiboot is applied more then ever. By
installing Windows Vista next to an already installed Windows XP system,
it is still possible to go back to the previously installed Windows XP. This
procedure is useful, especially if you are not sure yet whether to upgrade to
Windows Vista or not. It is also common to install the same Windows version
twice (or more) on the same computer. Each installed Windows can be used and
optimized for different purposes.
The Windows bootmanager vs. an alternative bootmanager
Before setting up a multiboot system, it is important to understand how it works.
This page first describes how the Windows bootmanager (the most used bootmanager) works.
This information is important to understand the disadvantages of this bootmanager. These disadvantages could be evaded by using an alternative bootmanager, which is described next. The page finalizes with the information how to
create a multiboot system by imaging one primary partition (with a already
installed and optimized Windows) to another primary partition.
ATTENTION: Al kind of operating systems (like Linux) could be used to setup a multiboot system. This page only describes setting up a multiboot system with Windows operating systems. Read the manual of those other operating systems for more information about setting up a multiboot system with one of those operating systems.
|
|
Because of the complexity of multiboot, here are some of the basic concepts concerning a multiboot system:
TIP: For more information, visit the page about partitioning the hard disk.
If multiple primary partitions are created, installing an additional operating system is quite simple. The Windows setup shows which partitions are available to install Windows on and asks which to use. The new Windows installation will be added to the boot menu of the already installed bootmanager (on the active partition). In those cases, the bootmanager is used by default, which results in the following boot process:
ATTENTION: In the most common situation where only one Windows operating system is installed (a computer without multiboot...), the bootmanager is loaded but doesn't show a boot menu. Windows is started immediately without the interference of the user.
The installation order of the different Windows versions
Every Windows version has it's own type of bootmanager. Because the bootmanager
of the already installed operating system is replaced by the bootmanager of the newly installed operating system, it is wise to start with the oldest Windows
version and to end with the latest version. This prevents the problem that the
bootmanager belonging to the older Windows version doesn't recognize the latest
version. For this reason it is important to start with Windows 9x, followed by Windows XP (Home, Pro, Media Center)
and to end with Windows Vista!
After the different operating systems are installed, the boot menu of the multiboot system is ready to use. Sometimes the boot menu needs to be changed manually (for example when there is an undesired Windows installation is mentioned, the names of the mentioned operating systems has to be changed, or the boot information need to be updated). The Windows XP bootmanager stores the boot information in the BOOT.INI file while the Windows Vista bootmanager uses the BCD (Boot Configuration Data Store). So, if the boot information need to be changed, this has to be done in the BOOT.INI file (XP) or the BCD (Vista), depending on the installed Windows version(s).
Changing the BOOT.INI (Windows XP)
The BOOT.INI file in Windows XP is stored in the root of the active
partition and can be viewed and changed with a simple text editor. This file is
opened by the sub System in the Control Panel, tab Advanced,
button Settings at the sub Startup and Recovery,
button
Edit. This
procedure disables the file protection temporarily and opens the file
automatically with Notepad. Be careful in making changes to this file:
typing errors can result in boot failures!
In the example below shows the content of a BOOT.INI file belonging to a multiboot system with three different Windows XP installations (Windows XP Home, Windows XP Pro and Windows XP Media Center Edition). The timeout of 30 will show the boot menu for a maximum of 30 seconds. When there is no input from the user, the operating system mentioned at default will be booted by default. If there is only one row below operating systems, this will be the default as well and booted immediately at startup without showing the boot menu.
[boot
loader]
timeout=30
default=multi(0)disk(0)rdisk(0)partition(1)\WINDOWS
[operating systems]
multi(0)disk(0)rdisk(0)partition(1)\WINDOWS="Windows XP Home"...
multi(0)disk(0)rdisk(0)partition(2)\WINDOWS="Windows XP Pro"...
multi(0)disk(0)rdisk(0)partition(3)\WINDOWS="Windows XP Media Center"...
Windows Home, Pro and Media Center are respectively installed on the first, second and third primary partition. In those three cases, the system files are stored in the folder WINDOWS of these partitions (this is the default folder for system files used by Windows).
Although manually changing the default operating system is easily, it is safer to change it with the dropdown menu Default operating system (in the window Startup and Recovery). If this is done manually and the default system no longer corresponds to one of the mentioned operating systems, then an error message at boot will be shown. And when Windows won't boot anymore, it becomes hard to correct the boot.ini file...
TIPS FOR SOLVING BOOT PROBLEMS...Removing an old installation from the boot menu Damaged boot sector Missing HAL.DLL ATTRIB C:\BOOT.INI -a -h -r -s |
Changing the BCD (Windows Vista)
The
BCD used by Windows Vista is stored in the folder boot on the active partition
and can be edited with the command BCDEDIT. While the file BOOT.INI
within Windows XP is easily edited with Notepad, it takes some effort to
understand the command
BCDEDIT. This command is that complicated, only a few know how to apply it.
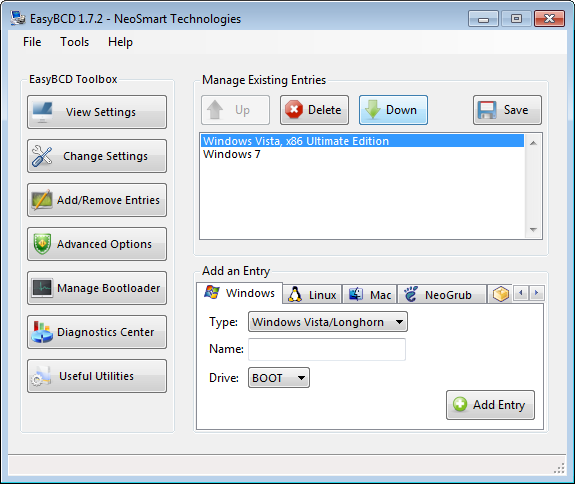
Fortunately, the BCD can be edited by using a tool like
EasyBCD (download:
www.neosmart.net/dl.php?id=1). And these kind of tools prevent making errors as well!
TIP: Visit Microsoft's web page (www.microsoft.com/whdc/driver/tips/debug_vista.mspx) for more information about the command BCDEDIT and manually changing the BCD.
The example below shows the use of the tool EasyBCD. The button View Settings shows the current settings of the Windows Vista bootmanager. The buttons Change Settings and Add/Remove Entries can be used to make changes to the BCD, like changing the default operating system, changing the boot menu order or removing a Windows entry from the boot menu. When an operating system has been removed from the BCD, the accompanying system files can be removed using the Windows Explorer of one of the other Windows entries.
As described above, creating a multiboot system while using the default Windows bootmanager isn't difficult: just install Windows more then once on different primary partitions. When the computer start, a boot menu is shown with the installed Windows versions. This method is effective and almost always error free. But using the Windows bootmanager has some disadvantages as well, but you rarely read about it.
Each Windows installation is able to access the files on the other system
partitions
The most disadvantages of the Windows bootmanager are caused by the fact that
all system partitions are fully visible and accessible from all Windows
installations. So, the booted Windows installation has access to the (system)
files on the partition of the not used Windows installations. Because the
partitions are visible to the user, they can be changed by the user, programs
and viruses as well (which can result in a damaged system). And in case
different Windows versions are used, then there is a risk that the Windows XP
check disk will damage the
Windows Vista system partition while the hibernation could cause big problems in
the mutual file systems. These risks are not that small and a mistake is quickly made (because the system partition letters are
mixed up quickly by accident!).
TIP: This problem is partially solved by removing the disk letter of the not booted Windows installations in each Windows installation. This is done by Windows Disk Management (available by the sub Administrative Tools of the Control Panel, Computer Management). When these partitions are no longer accessible by their drive letter, then they are no longer accessible in the Windows Explorer. Keep in mind that the disk letter of the booted Windows installation can not be removed or changed.
The disk letters of the Windows partitions are fixed
At setup, Windows is installed on one of the primary partitions. The disk letter
of those partitions are fixed at the moment of installing Windows, depending on
the partition table of that moment. The active (primary) partition receives the
disk letter C: while the other primary partitions, logical drives and CD players
receive the next available drive letters. As long as there are no changes in the
partition layout preceding the installation of the different Windows versions (like
activating and/or hiding partitions), all partitions will receive the same disk
letters in every Windows installation. By the way, the partition information
(and the accompanying disk letters) is stored in the registry within the
registry key HKLM\System\MountedDevices. So, the active (primary) partition receives the disk letter C: in every
Windows installation. And the other system partitions receive the disk letters
D:, E:,....
When the default setup procedure is followed, the disk letter C: can not be used
for every Windows installation.
Microsoft has chosen for the option to place the bootmanager on an unusual location in the boot process, namely in the boot sector of the active partition. But, when the bootmanager would have been loaded earlier in the boot process, the most important disadvantages would have been prevented from happening. That is one of the reasons alternative bootmanagers use the Master Boot Record (MBR) of the hard disk, which causes the bootmanager to make changes to the partition table (like activating another partition and/or to hide other partitions) before the active partition is booted.
ATTENTION: Not every alternative bootmanager has to be loaded into the MBR (like the Linux bootmanager GRUB, www.gnu.org/software/grub)! Some of them are also able to use a specially reserved area of an active FAT partition, but this method is not discussed here.
The labels of the system partitions are changed automatically
By placing the bootmanager into the MBR, the primary partition belonging to the
Windows to be booted can be activated and made visible automatically, while the
other primary partitions will be set to hidden simultaneously. The necessary
changes to the partition table are applied before the Windows operating system
on the active partition is started. Because the active partition changes
depending on the chosen Windows system in the boot menu, every Windows operating
system uses it's own bootmanager (having a boot menu with only one entry which
is booted by default).
So, the alternative bootmanager changes the active and hidden partitions, depending on the chosen operating system. Because these labels are changed before Windows boots, the partitions of the other operating systems are hidden by default before Windows starts. This will make the unused partitions invisible for the Windows bootmanager of the booted partition. The result: the Windows bootmanager doesn't know better then there is only one primary partition with only one Windows installation.
Booting process while using a bootmanager in the MBR
The booting process of a multiboot computer with the bootmanager installed
in the Master Boot Record follows the following steps:
Every Windows is installed on a partition with the disk letter C:
During the installation procedure of Windows, all (visible) partitions receive a
disk letter. By default, the active primary partition of that moment receives
the disk letter C: By changing the active partition prior to the installation of
Windows (by labeling this partition as active), every Windows installation will
be installed on an active primary partition with the disk letter C:
The advantages of a bootmanager in the MBR
Because the alternative bootmanager is placed in the MBR, the unused primary
partition can be set to hidden. This risk of a damaged operating system is
significantly lower because the hidden partitions are no longer accessible from
the started operating system. Because the hidden partitions can't receive a disk
letter (and because the Windows partition is always on the active partition),
Windows is always installed on the partition with the drive letter C:.
There are different kinds of alternative bootmanagers
A bootmanager placed in the MBR replaces the original code in the MBR, but the
available space in the MBR is not sufficient to install a complete bootmanager.
For this reason bootmanagers also use the empty space between the MBR and the
first partitions (the available space is still limited, which makes it hard to
store a bootmanager with a heavy graphical interface) or the space of an
additional FAT32 partition (which offers enough space, but costs one partition).
Both alternatives have their advantages and disadvantages.
TIP: MasterBooter <this tool is no longer available> is an example of an alternative bootmanager which uses the (limited) free space between the MBR and the first partition. For this reason, the graphical interface of the boot menu looks old fashion, but the bootmanager does it's work properly! Visit the page about MrBooter for more information about using this bootmanager.
Some more tips
So, it is quite easy to setup a multiboot system using an alternative bootmanager: Windows is installed multiple times on a primary partition made active prior to installing Windows. However, to setup a multiboot system with the same Windows version twice or more, it is better to copy the already installed Windows (lets say OS1) to one of the other primary partitions (OS2). This can be done by restoring an earlier created back-up of the operating system OS1 to the partition for OS2 or by copying the operating system directly from one partition to the other using imaging software like Partition Saving (download: www.partition-saving.com).
Alternative bootmanager is needed after imaging Windows
Although this procedure saves a lot of time because Windows only needs to be
installed and optimized once, there are also some disadvantages. In case the
Windows bootmanager is used, there are immediate problems with the assigned
driver letters. The copied Windows installation (OS2) doesn't know better then
it is installed on partition C: (just like the original Windows), while this
hard to realize using the Windows bootmanager! By using an alternative
bootmanager in the MBR, this problem does not occur because every Windows
installation is able to use the drive letter C:.
ATTENTION: Before imaging OS1 to the partition of OS2, it is important that this partition didn't receive a disk letter yet in OS1! To prevent this from happening, hide the partition for OS2 by using partitioning software until the imaging has taken place. The next step is to hide the partition of OS1 before the OS2 is booted for the first time, else the partition of OS1 will still receive the drive letter C: (because this is already the case in the original installation of OS1) which makes it impossible for OS2 to claim C:. This procedure could possibly be prevented by deleting the registry values in the registry key HKLM\System\MountedDevices before imaging the OS1 to the partition reserved for OS2.
Don't forget to change the BOOT.INI/BCD!
After copying the Windows installation, it is also very important to change the
boot information used by the Windows bootmanager of OS2. The BOOT.INI (XP)/BCD (Vista)
of the OS2 partition needs to be changed to make sure that it doesn't use the
same (original) partition for the registry files.
When the BOOT.INI/BCD is not changed, it will result in irreversible problems in both OS1 and OS2 as soon as critical changes are made to one of the Windows installations. In the beginning all seems to work fine, as long as there are no critical changes... This is what happens: registry changes in OS2 (like a change in the Windows XP-services/Windows Vista-services) are applied in the registry files stored on the partition of OS1, even when the partition of OS1 is hidden for OS2! So, registry changes of both OS1 and OS2 take place in the registry files belonging to OS1, while the changes in the (system) files belonging to these registry changes are stored on or removed from the partition of the active Windows installation of that moment. which makes them invisible for the other Windows (if the partition would not be hidden, the files aren't accessible by their original drive letter as well).
Such a situation would result in big problems for sure! This situation is identified easily by making some changes in the registry and notice what happens in the other operating system (like moving a shortcut on the desktop of OS1 and to verify if this is the case in OS2 as well). If they still use the same registry, then the BOOT.INI/BCD of the copied partition (OS2) needs to be changed to make sure it points to the right partition.
Would you like to know more about making these changes to the BOOT.INI/BCD, read the page about setting up a multiboot system with MrBooter.
© 2001-2022 - Menno Schoone - SchoonePC - Rotterdam - The Netherlands