In case the computer is used by multiple persons, it is very useful to create multiple user accounts. Each user has his or her own preferred settings, documents, e-mail accounts, contacts, calendar, internet bookmarks (favorites) and probably wants to be logged in with an instant messaging program. For every newly created user account, all the preferred settings have to be applied, which is not very efficient. Think about all the Windows settings, which are enough for half an hour clicking! That's why this page describes how to setup multiple user accounts as efficient as possible.
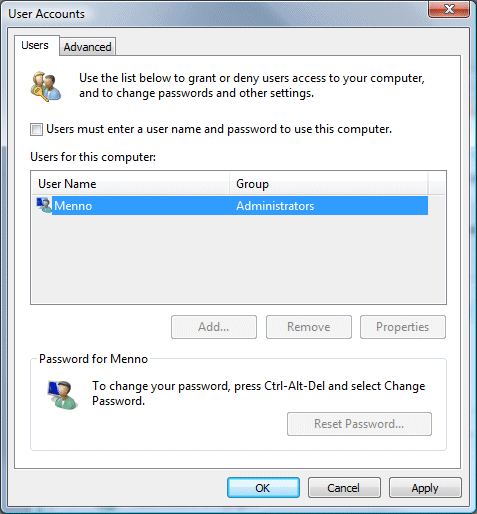
Changing the account specific settings (like the shown name, the picture, the password, the account type and parental control) can be changed by the item User Accounts of the Control Panel. Creating a new user account is done with the option Manage another account, option Create a new account. The new user account can be setup as a Standard user (an account with limited privileges to change essential system settings) or as an Administrator (an account with complete access to almost all settings). If it is not necessary that the user has to make any system changes, it is wise to create a standard user account with limited rights instead of an administrator account with full control. Because the rights of a standard user are actually too limited, it is wise to start with an administrator account and change the account type afterwards to a standard user (or don't use the standard user at all...).
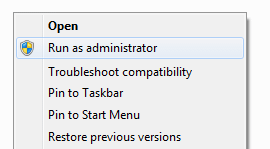
TIP: Be aware that it is still possible to do administrator tasks within a standard user account, but only when the username and password of an administrator account is known. If a task needs administrator rights, the user will be asked to enter the username and password of an administrator account (if this is not the case, right click the task/program and select Run as administrator).
|
|
THE COMMAND NET USERIf it is not possible to create or remove a certain user account try the command NET USER in the command prompt with additional administrator rights. Right click the shortcut to the Command Prompt (start menu, All Programs, Accessories) and select Run as administrator to start the command prompt with administrator rights. The command NET USER shows a list of all available user accounts. To create a user account, use the command NET USER loginname /ADD and to delete a user account, use the command NET USER loginname /DELETE. Especially the last command to delete a user account can be useful. Use the command NET HELP to view all options of the command NET. |
USE SHORT ACCOUNT NAMESAt the moment of creating a user account, it is better not to use any spaces in the account name. This can be confusing for some older programs. Afterwards, when the user account has been set up, it is still possible to change the shown account name (for example into a first and last name). After the change of the name, the first given account name will still be used internally. |
STANDARD ACCOUNTS ARE SAFERUse the administrator account to make changes to the system and a standard user account for your daily activities when you would like to be as safe as possible. TIP: Did you lose the password of the administrator account? Visit the page about bootable CD's to get access to the account! |
If there are multiple user accounts, a welcome screen is shown at start-up of Windows, but sometimes it is practical if one of the user accounts is logged on automatically (without showing the welcome screen). Especially when the other user accounts are barely used, this can be very useful. To accomplish the automatic logon, start the Command Prompt (Start menu, All programs, Accessories, right click the shortcut and select Run as administrator) enter the command control userpasswords2, tab Users and deactivate the option Users must enter a user name and password to use this computer. In the next windows, specify the user account name and the password of the account to be logged on automatically.
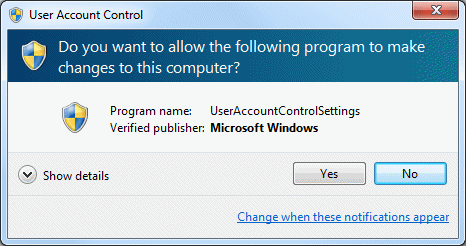
In Windows 7, all accounts are subject to additional security measures known under the name User Account Control (UAC). UAC makes sure that for every essential change in the system settings has to be confirmed. If this behavior becomes irritating or causes troubles, UAC can be deactivated or made less active with the option Change User Account Control settings in the item User Accounts in the Control Panel. The page about User Account Control has more information about limiting the number of UAC messages or to deactivate User Account Control.
By default, an administrator account does not start with the additional administrator rights. If needed, the administrator rights can be activated by right clicking a program and to chose for Run as administrator. If a program needs these administrator rights to function properly, then it is possible to start the program with these rights by default. This is done by right clicking the shortcut or program and chose for Properties, tab Shortcut, button Advanced and to activate the option Run as administrator (if available).
WHAT IF THE LIMITED RIGHTS ARE TOO LIMITED?It happens frequently that a standard user is not able to apply certain necessary changes because the rights are too limited. If it is a onetime issue, the account could be changed to an administrator account temporarily, but that is not a perfect solution. A better method is to give the user account additional rights for files and registry keys to give them access without switching the account to an administrator account. The Sysinternals tool Process Monitor (download: www.microsoft.com) can be used to find out which files or registry keys are causing the problem. This tool monitors the requested files and registry keys after the command Capture Events has been given. The next step is to add permissions to those files and registry keys within an administrator account. These settings are available by right clicking the registry key, option Permissions, tab Security. Change the permissions of the user account to Full Control for the registry key (use the button Add if the user name is not yet available). When Full Control is activated, the user account is allowed to make any changes to the registry key. Changing the permissions of files and folders works similar. The permissions are available by right clicking a file or folder, option Properties, tab Security. Visit the page about user account control and administrator rights for more information about solving problems by changing permissions. |
The personal documents and settings are stored in the folder C:\Users which contains subfolders for every user account (this folder is similar to the folder Documents and Settings of Windows XP). For every new user, a new subfolder is created automatically, to store the personal documents and settings. The content of this subfolder is shown in the following snapshot of the Windows Explorer (enable the option Show hidden files, folders and drivers in the folder options of the Windows Explorer to view the hidden folder):
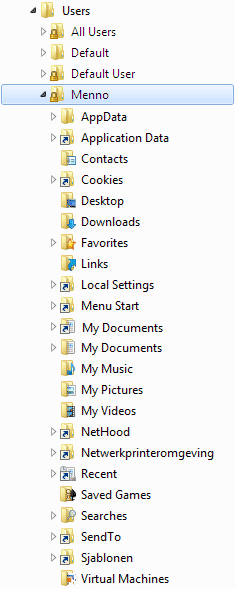
The folder is divided in subfolders for personal data like Contacts, Desktop, Downloads, Favorites (for the Internet Explorer), My Documents, My Music, My Pictures, My Videos, Saved Games and the important folder AppData with personal Windows and software settings. The stored data and settings in the folder C:/Users/loginname are only available for the user they are created for (but with the right permissions also accessible by other administrator accounts). This folder also contains some hidden symbolic hyperlinks which have the purpose to automatically forward requests to the old Windows XP folder locations to the new Windows 7 locations.
Libraries
The overview of the personal files is quickly lost because similar files (like
personal documents, pictures, music and video files) are frequently stored on
multiple locations. By using libraries, similar files are displayed together as
a single collection without moving the files from the original storage location
(by using shortcuts). By default there are libraries for Documents,
Pictures,
Music and Videos which can be opened quickly by the start menu.
By default only the files in the personal and public folders are added as subfolders of a library. New locations can be added simply to the library: right click the library, select Properties, button Include a folder, navigate to the folder to be added. When a library contains multiple folders, use the button Set save location to set one of these folders as the default storage location (this option is useful when multiple partitions are used to separate the personal files from the operating system).
TIP: The user can add libraries (e.g. for his own projects) as well: right click Libraries, select New, Library and immediately enter a suitable name. Right click the newly created library, select Properties and use the button Include a folder to add multiple locations to the library. If needed, use the option Optimize this library for to to select the type of files (documents, music, pictures or videos) which are stored in the library to optimize the view.
Copying documents and settings to another account
Copying the user account settings to another account is not that difficult.
First create an account where all user account related settings are optimized,
without adding the user specific settings like e-mail accounts and passwords. To
save these settings go to the start menu, All Programs, Accessories, System
Tools, Windows Easy Transfer,
click Next, select An external hard disk or USB flash drive and
This is my old computer.
After a short analyzing period which files and settings can be transferred, deactivate all user account except the account with the
settings. Proceed with the button Next,
button Save (a password is not needed)
and select the storage location (e.g. C:). The file will be given the name
Windows Easy Transfer - Items from old computer.MIG
(the name can be changed), save the file and close the wizard.
Restoring the saved settings to a new user account is similar. Start Windows Easy Transfer (this can be done from the same user account where the settings have been saved), click Next, select An external hard disk or USB flash drive once again followed by This is my new computer. Proceed the wizard by selecting Yes, navigate to the saved MIG-file and open it. Select the link Advanced options and at the sub User accounts on the new computer select the user account to restore the saved settings to (this is not the account with the same name!). When the new user account was not yet created, it can be done here as well. Next click the button Save followed by the button Transfer to transfer the settings to the new account. As soon as the transfer is finished, the current account can be logged off to logon to the new user account. Finally, the MIG-file can be deleted. There will still be a small number of changes to be applied, but in most cases the result is satisfying.
TIP: Start restoring the settings can be done by double clicking the MIG-file as well.
The folder C:\Users\Public (in Windows XP known as All Users) contains documents and settings which apply to all users. For example, if there is a shortcut available in the subfolder Desktop of the folder Public, it will be shown on the desktop of all user accounts. If certain settings or files apply to all users accounts, it is preferred to change the content of the folder Public (if possible) instead of changing all user accounts individually. Files which have to be available by all users can be stored in the subfolders Public Documents, Public Downloads, Public Music, Public Pictures, Public Recorded TV or Public Videos. The shortcuts in the start menu which apply to all users can be found at the location C:\ProgramData\Microsoft\Windows\Start Menu.
Default settings for a new user account
The subfolder C:\Users\Default contains the default settings for a new user account. Make changes to this
folder to make sure that the desired settings are applied to a newly created
account. The more user accounts have to be created, the more time is saved by
setting up the new accounts.
By default the personal files (like documents, pictures, music, videos, e-mail, contacts) are stored between the operating system files on the Windows partition. This is not the most practical situation, therefore it is better to save the personal files separately on a data partition. By creating a personal folder for each user account on this data partition (like D:\Menno), the personal files can be stored without losing the overview. This has additional advantages (especially when Windows won't boot anymore), like being able to create a back-up of the personal files automatically and/or to safely restore an image of the operating system. Visit the page about changing the storage location of the personal folders for more information.
© 2001-2022 - Menno Schoone - SchoonePC - Rotterdam - The Netherlands