After Windows 7 has been installed and a few settings of the Start menu and the desktop have been changed, it is time to make Windows 7 more user-friendly.
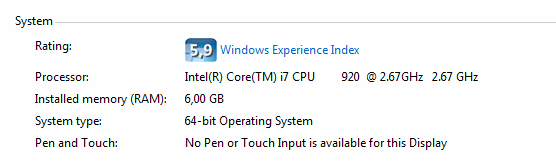
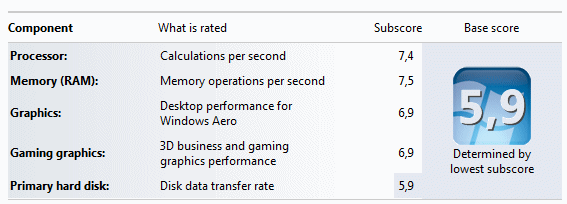
The shortcut System in the Control Panel shows a basic system overview with the calculated Windows Experience Index to measure the capabilities of the hardware. The total index value (the Base score, with a maximum score of 8) equals the lowest value of the five components (the weakest chain), each covering hardware like the processor, memory (RAM), graphics, gaming graphics and the primary hard disk. This score will predict whether the hardware is suitable for the different features within Windows 7 and which hardware replacements would most improve the overall system performance.
Clicking the link Windows Experience Index shows the individual hardware scores. Click the option Re-run the assessment to recalculate the Windows Experience Index.
|
|
NOT POSSIBLE TO CALCULATE THE EXPERIENCE INDEX?
If it is not possible to (re)calculate the Experience Index, in most
cases it can be solved by deleting the files in the folder C:\Windows\Performance\WinSAT\DataStore
using the Windows Explorer (if needed change the explorer settings to make
hidden files visible). Start the
registry editor as well and
delete the registry value PerfcplEnabled in the following registry keys (if
present): |
DETAILED RESULTS OF THE EXPERIENCE INDEXThe total score of the experience index equals the lowest value of the five components However, it's not clear what the values of the components are exactly based on, which makes it hard to do hardware testing to increase the scores and the overall performance. Fortunattely, a report of the more detailed calculations is saved in XML-files, stored in the folder C:\Windows\Performance\WinSAT\DataStore. The command WINSAT.EXE formal (use the Command Prompt) starts a calculation of the experience index, the command WINSAT.EXE /? shows the other options for this command. |
CHANGING THE PRODUCT KEYIn contrast with earlier Windows versions, it is possible to change the Windows 7 product key by clicking the link Change product key at the bottom of the window View basic information about your computer (Control Panel, System). After a change in product key, Windows 7 requires to be activated again to verify the new key. This option saves time in case of an installed but illegal version of Windows 7. The option to reset the product key is not always present, especially in OEM-versions. |
SUPPORT FOR MULTIPLE LANGUAGESWould you like to change the user interface language (e.g. when the computer has been bought abroad)? The most expensive consumer version Windows 7 Ultimate, supports multiple languages. At setup, the default language is installed; the additional languages can be added through the Microsoft Update after the installation has been completed. After the language update has been added, the user interface language can be changed by the control panel item Region and Language, tab Keyboard and Languages, option Choose a display language. The other Windows 7 versions only support one language for the user interface, the free tool Vistalizator (download: www.froggie.sk) can be used to bypass this limitation! This tool uses the original language files, but be aware that this workaround is not supported by Microsoft! Uninstall and hide update KB971033 in case Vistalizator is causing problems with the Microsoft license! |
The advanced system settings are available by System in the Control Panel, option Advanced system settings (at the left in the task pane).
Tab System
Protection
When there is any trouble with the Windows operating system, it is nice to know
Windows has a build-in system restore
to a previously created restore point.
The recovery data is stored in the folder System Volume Information
(present on each partition) and can be recovered any moment. But, be careful using this feature, before you know you are worse of then
before (besides that you won't be the first to lose personal data unexpectedly). In Windows
7,
System Restore has an
additional feature to be able to restore single files to a previous version,
called shadow copies.
Restoring a shadow copy of a file saved by System Restore can be done by
right clicking the file in the Windows Explorer, option
Properties,
tab Previous Versions.
When image software is used to create an image of the Windows partition, System Restore (shadow files included!) can be deactivated, which saves many Gb's of hard disk space. Deactivating System Restore for the Windows partition is done on the tab System Protection, by activating a partition with personal data (D:), restoring shadow copies is still available for these files (be aware that in case of a multiboot system, System Restore will probably result in problems on partitions which are shared between the different operating systems).
DISABLE SYSTEM RESTORE AS LATE AS POSSIBLEDisable System Restore as late as possible, at least until all hardware drivers and software are installed and working properly. If the installation of hardware and/or software creates a problem, it is still possible to restore the computer to a system restore point before the problems occurred. If all hardware and software are installed and essential changes in the system settings have been made, it is time to disable system restore and to create a system image instead. An image of the Windows partition is more reliable and accurate then System Restore, in case of system troubles. |
Tab Remote
Within Windows 7, it is easy to give someone Remote Assistance to take over the
control of the computer, using the internet connection. If you are not able to
fix a problem yourself, someone can show you using a remote connection while sitting
behind his own computer. This person gets control over the computer, so only give
people access who you can trust. Remote Desktop makes it possible to give
users almost full control over the computer using a remote connection. If Remote
Assistance and/or Remote Desktop are not used (in most cases), it is better to disable
this feature for security reasons.
Tab Computer Name
On this tab, the computer is given a name which makes it possible to identify
the computer by other computers in the same network. This name must be unique
for the network it is attached to, while the workgroup name must be equal for
all computers.
Visit the page creating a
(wireless) network for more information about connecting computers to a
network.
Tab Advanced
On the tab Advanced many system related settings can be changed and/or
optimized. At the third button Settings (sub Startup and Recovery)
the option Automatically restart can be disabled. This prevents Windows
7 to restart automatically in case of system errors, which makes it easier
to investigate the cause of the problem.
The first button Settings (sub Performance) opens the window Performance Options. One of the options is to adjust the visual effects to achieve a better performance (changing the visual settings is discussed on the page about the Start menu and Desktop). To change the amount of virtual memory (a slower alternative to the faster RAM memory) addressed to the paging file can be changed on the tab Advanced of the same window, button Change. In most cases the Windows partition (C:) is the most suitable for the paging file (always use the fastest hard disk for the Windows partition and the paging file). The default size of the paging file can be changed by deactivating the option Automatically manage paging file size for all drives, selecting the partition and changing the initial and maximum size. In most cases the total amount of RAM is a good value for both the initial size and the maximum size (set both higher when the computer is used for processing multiple large files like pictures or video's). Don't forget to click the button Set to confirm each change in settings. For the changes to take effect, a restart of the computer is necessary.
CLEARING THE PAGEFILE AT SHUTDOWNThe virtual memory uses a paging file which is stored in the file PAGEFILE.SYS on C: by default. To make sure someone else is not able to view the content of this file, this file can be overwritten every time Windows is shutting down. For this purpose, the DWORD value ClearPageFileAtShutdown with the value 1 has to be added to the registry key HKLM\SYSTEM\CurrentControlSet\Control\Session Manager\Memory Management (deleting the registry value or changing the value to 0 will disable this feature). As a result, Windows will shut down remarkably slower. For this reason, only apply this tweak in case it is really necessary for privacy purposes. |
READYBOOST AND READYDRIVEIf there is not enough RAM memory available, the system starts using the slower paging file. Because the paging file is stored on the hard disk, it will slow down the system performance. Fortunately ReadyBoost is a better alternative because it uses the relatively faster flash memory (a USB-stick, Compact Flash (CF)- or Secure Digital (SD)-cards) to improve the system performance. After connecting flash memory, Windows will show a request whether the memory must be used to improve the system performance. The ReadyBoost settings can be changed on the tab ReadyBoost (start the Windows Explorer, click right on the flash memory and chose Properties). The used paging file (ReadyBoost.sfcache) will be encrypted using AES 128-bits encryption, which ensures that the written data can't be read if the memory stick has been stolen. BTW: the advantages of ReadyBoost are hardly measurable while using a system with enough RAM memory! ReadyDrive (where the flash memory is integrated in a hard disk) uses a similar concept. Data written to the hard disk is (temporarily) stored on the flash memory (as well). Because this memory is much faster than the hard disk itself, it speeds up the system. The second advantage is the power saving, because there is no need to run the hard disk when the data can also be stored on or read from the flash memory as well. Because the hard disk is used less frequently, it extends the hard disk service life as well. The relatively low speed of a USB2.0 connection compared to the hard disk connection makes ReadyDrive a better alternative to ReadyBoost. The power saving characteristic of ReadyDrive makes it especially valuable for laptops. |
The Windows Explorer is used to browse and manage the content of hard disks, CD players and other hardware which are able to store data. With a few clicks files are copied, new folders are created and CD's/DVD's are burned. By default there is a shortcut to the Windows Explorer in the folder All Programs, Accessories of the Start menu, an awkward location for a frequently used program. To save a lot of clicks, copy the shortcut to a more accessible location like the desktop (click right on the shortcut and select Send To, Desktop (creating shortcut) or pin to the Start menu (click right on the shortcut and select Pin to Start menu). The Windows Explorer can be opened quickly as well by the start button: right click the Start button and select Explore.
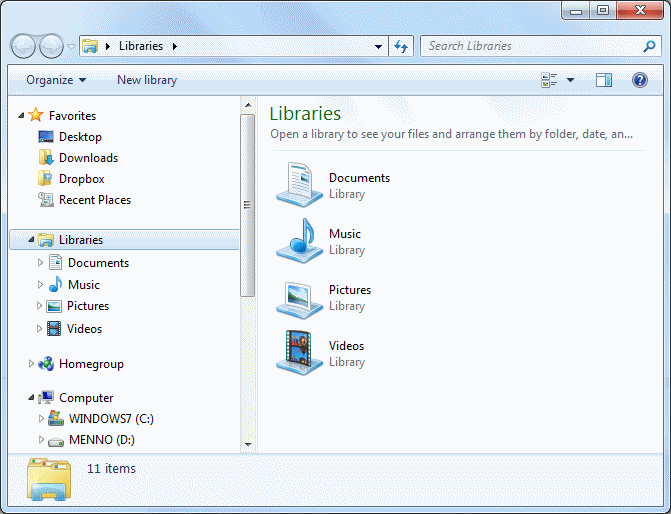
Libraries
Just like previous Windows versions, similar files are stored on different hard
disk locations. However, Windows 7 has the option to group those files in
different Libraries (like libraries for documents, pictures, music,
videos). Visit the page about the
user account settings for more
information about using libraries.
Changing the default settings
The Windows Explorer shows the relative path in the address bar,
it doesn't take long to get used to navigating through these relative paths. The
width of the available space for the navigation tree on the left side is too small to show all folders, but can be widened up by dragging the vertical
separating line to the right. The folder tree options can be changed by clicking
the button
Organize,
Folder and search options,
tab General, especially the option
Automatically expand to current folder is very useful because of the
automatically expanding folders while browsing the folder tree. The menu bar is hidden by default, but can be
shown temporarily by pressing the left ALT key. Click the button
Organize,
option Layout, Menu Bar to enable the permanent visibility of the menu bar.
The system files are hidden by default, which is a fine setting for the less experienced users. If this setting is less practical, disable this option. Click the button Organize, Folder and search options, tab View, and change the following settings:
The other options are shown below:

If the hard disk is not that fast, it can be useful to enable the option Always show icons, never thumbnails to replace the miniature pictures by the default icon (this option only has an effect when the view is set to medium or large icons). By deactivating the option Hide empty drives in the Computer folder empty drives (like a card reader or an empty DVD drive) are shown as a subfolder of Computer (some of the items will still be hidden in the folder tree of the Windows Explorer: right click an empty area above the folder tree and select Show all folders). The option Launch folder windows in a separate process uses more memory, but prevents shutting down all explorer windows after a crash of the Windows Explorer (if this is no problem, leave this option disabled). The option Use check boxes to select items can be useful to select multiple files.
TIP: When the thumbnails (for a quick display of pictures, videos and documents when you open a folder) are shown incorrectly, delete them with Windows Disk Cleanup. If you delete these thumbnails, they will be automatically recreated as needed.
WINDOWS EXPLORER TIPSPressing the F5 key will refresh the show windows (just like the Internet Explorer). The key combinations CTRL-C/CTRL-X will copy/cut files and folders and CTRL-V will paste them at the current location. Pressing down the SHIFT or CTRL key can be used to select multiple files/folders and the key combinations SHIFT-HOME and SHIFT-END will jump to the beginning and the end of the list. |
By right clicking the recycle bin, option Properties the settings for every partition can be changed. Disabling the option Display delete confirmation dialog saves a click each time a file is deleted. Holding down the SHIFT key while deleting files and/or folders, will delete the files without showing up in the recycle bin.
TIP: If you have been too enthusiastic deleting files, they can still be restored (even if they are removed from the recycle bin) with recovery tools like PC Inspector File Recovery (download: www.pcinspector.de, run as administrator) and Recuva (download: www.recuva.com). When deleted files are overwritten by new files, they are no longer recoverable (note that installing a recovery tool will overwrite deleted file, therefore install a recovery tool before there are any files to recover…).
The option Sound in the Control Panel, tab Sounds can be used to change or disable the sound schemes. If the Windows sounds are irritating or not useful, disable them by selecting the sound scheme No Sounds. It is also possible to disable or change the different sounds effect individually. The Volume Mixer icon in the system tray can be used to adjust the volume (for each program individually). The icon can be removed by the properties of the system tray, available by right clicking the clock.
During the Windows setup the user is asked to select the default keyboard setting. This setting can be changed at Regional and Language in the Control Panel, tab Keyboards and Languages, button Change keyboards. If there is more than one input language defined then it is possible to switch between the input languages by pressing the left ALT key en the right SHIFT key. Because this key combination is hit accidently on a regular basis, the change in keyboard layout can be quite irritating. If you are not aware of the effect of this key combination, a reboot is necessary to fix the changed keyboard layout. To make sure this does not happen anymore, delete the input languages which are not used by default.
The default keyboard layout is United States-International has the side effect of not showing the quotation marks immediately after pressing the quotation key (' or "). If you do not like this behavior select another keyboard layout (like US).
THE EURO SIGNOn most keyboard, the € sign is placed on the same key as the number 5. Use this key in combination with the right ALT key to print the euro sign. The euro sign can be printed with the code 0128 on the numeric keyboard in combination with holding down the left ALT key. |
The option Programs and Features in the Control Panel shows the currently installed programs. The link View installed updates at the left in the task pane can be used to show (and uninstall if desired) the installed updates as well. The link Turn Windows features on or off in the task pane makes it also possible to add or remove specific Windows features.
Verify the settings of the item Default Programs in the control panel, link Set your default programs as well, where the default programs for internet, e-mail, agenda, contacts, pictures and media are set.
To prevent the screen from burned in pixels, enable a screensaver: open the item Personalization in the control panel (also available by right clicking the desktop), option Screen Saver. The most valuable screensaver is Photos. This window also has the option to enable or disable the logon screen after inactivating the screensaver (option On resume, display logon screen). This will prevent unauthorized persons to gain access to the user account at the moment the screensaver is active.
Instead of a screensaver, the monitor can also be turned off automatically after a certain amount of time has passed. This saves energy and extends the life of the monitor. These power settings are available by clicking the link Change power settings (also available by Power management in the Control Panel), task Change when the computer sleeps (at the left in the task pane). Fill in the time to wait (from the point of no activity) until the monitor has to be turned off automatically. The time to wake-up of modern monitors is very low, so it won't cause much delay.
Windows 7 uses three different features to turn the computer into a power saving mode: sleep, hibernation and hybrid sleep. The feature sleep is an energy saving mode where the computer stays 'on' to be able to awake within a few seconds. The disadvantage is the loss of data (which hasn't been saved) when there is a loss of power. The hibernation actually turns off the computer after the memory has been saved into the file C:\HIBERFIL.SYS. After turning on the computer, the data is loaded into the memory and to wake up Windows relatively quick compared to a reboot. Hybrid sleep combines both sleep and hibernation for the best result (attention: Windows 7 calls this combination sleep!). The hybrid sleep stores the memory to the hard disk followed by a power saving made. In this mode no data will be lost while the computer returns from standby relatively quick. The hybrid sleep can only be activated when the motherboard supports this feature.
Change power settings
The power settings for sleep and hibernation can be changed by the item Power
Options in the control panel. The task Change when the computer sleeps
can be used to change the period of inactivity before the display is turned off
and/or the computer goes to sleep. Click the link Change advanced power
settings to change the (hybrid) sleep and hibernate settings.
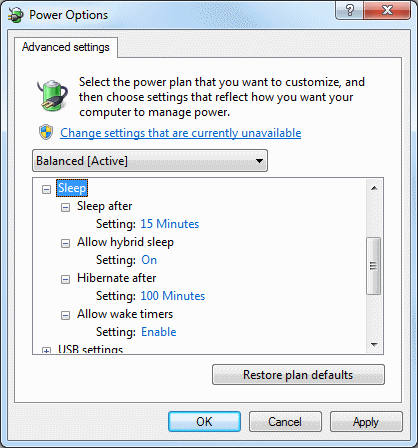
If hybrid sleep is supported then the option to hibernate won't be present! If needed, the option to hibernate can be added with the command POWERCFG /hibernate ON in the Command Prompt (Start, All programs, Accessories). Start the Command Prompt with additional administrator rights by right clicking it and to select Run as administrator! The hybrid sleep is not applied with laptops because they don't have to handle the sudden loss of power. At the moment the battery loses power while the laptop is in sleep, then the computer will become active again go into hibernate (which doesn't use any power) to prevent the loss of data. Remember that it is wise to reboot Windows once in a while to prevent problems.
ATTENTION: For the more advanced power management settings, a motherboard with support for ACPI (Advanced Configuration and Power Interface) is needed. If the power management options are not available, verify the power management-options in the BIOS (in most cases available by pressing the DEL- or F2-key when the computer boots): at least S1 is needed for the sleep feature and S3 for hybrid sleep.
Changing the shut down button in a sleep button
The Start menu has got a shut down button by default to switch off the
computer. The other
options (like switching user, sleep, lock, restart
and log off) are hidden behind the arrow. The button to shut down the computer can be changed
in a sleep button by changing the property settings of the start menu (right
click the Start button and select Properties).
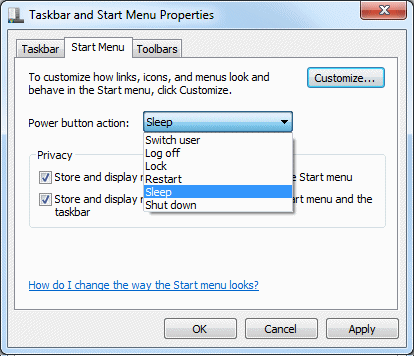
The power button in the start menu can be used to set the computer to sleep manually. Switching the computer to sleep can also be done with the on/off button after changing the default setting of this button to sleep (control panel, Power Options, task Choose what the power buttons do). After the on/off button has been changed to a sleep button, the start menu is needed to turn off the computer.
Disable the welcome screen after waking up from sleep
Windows shows the welcome screen by default after the computer returns from
sleep or hibernation, even if the user account isn't provided with a password!
This security option can be disabled by the sub Power Options in the
control panel. Select the task Require a password on wakeup in the task
pane, click the link Change settings that are currently unavailable and
activate the option Don't require a password.
Problems waking up from sleep/hibernation
When the computer wakes up incorrectly from sleep (e.g. the screen stays black),
there can be many causes and there is no simple solution to fix it. One of the
following tips will help solving the wake up problem: disable the screen saver,
install the latest available drivers for the motherboard and graphics card,
deactivate power management options in the BIOS like Re-call VGA BIOS From S3 or
as last option flash the BIOS
with the latest available version.
If there is still a problem, go to the control panel sub Power Options,
option Change plan settings and turn of the (hybrid)
hibernation and switch back to sleep as alternative.
Unrequested waking up from sleep/hibernation
The reason why the computer wakes up unrequested (in most cases caused by the
mouse of network adapter) can be found with the command POWERCFG -DEVICEQUERY WAKE_ARMED (open
the Command Prompt in the start menu, All programs,
Accessories). When the wake up is caused by a certain device, start the
Device Manager (available in the control panel), right click the device,
select Properties, tab Power Management and disable the option
Allow this device to wake the computer. Sometimes disabling the options Wake on Ring
and Wake on Lan at the power management options in the BIOS helps
as well.
With a simple trick an extended control (yet known as GodMode) panel can be added to Windows 7. Besides the traditional control panel options, this control panel also contains some options which would be hard to find elsewhere. The GodMode is activated by simply creating a new folder with the name GodMode.{ED7BA470-8E54-465E-825C-99712043E01C} (the location is not relevant and the name GodMode can be changed by something else like ExtendedControlPanel). After the folder name has been changed, the folder icon changes and the folder is automatically filled with hundreds of tasks. The GodMode is removed simply by deleting the folder... The extended control panel contains hundreds of different options, which make the items hard to find. The real value of the list of controls is to find the most interesting and to create a shortcut.
© 2001-2022 - Menno Schoone - SchoonePC - Rotterdam - The Netherlands