This page explains how the registry is build up, how to optimize it by defragmentation and cleaning, making changes to registry values with the registry editor and the tracking of registry changes with a tool like Process Monitor.
Applying registry tweaks
Making changes to the registry and registry tweaks is discussed in many computer
magazines and Windows related websites. It is very useful to have some knowledge
concerning the registry, because many settings are only available by a register
tweak and not by the user interface. However, for many the registry is an
unknown area and the intimidating warnings hold back the user of making any
manual registry changes. Those warnings are rightly, because making the wrong
changes can cause programs to malfunction or Windows won't boot anymore in worst
case scenario. But as long as the changes to the registry are as suggested (and
no other changes have been made), the risks are limited.
The real-time tracking of registry tweaks
Almost every change in the settings results in a specific change in the registry
values. When the registry value which has to be changed for a certain setting is
known, then the registry change can be stored in a registry file. This file can
be used to apply the setting quickly to other computers and user accounts. For
this reason, it would be interesting to track the registry changes which are a
result of changes in settings by the user interface.
Process Monitor is very useful for this purpose, more about this tool at the
end of this page.
|
|
Windows stores most settings for Windows, hardware, software and the user account in the registry. All registry values are loaded at the startup of Windows and the user account and is consulted by almost every process.
The registry is clearly arranged
The registry is clearly arranged with a simple tree structure (just like the
file system on a hard disk shown in the Windows Explorer) and contains many
registry keys and registry values. The registry keys are comparable to the
folders and the registry values (which contain the settings) are comparable to
the files in these folders. Without this clear structure, it would be hard to
find any registry value. After opening the registry editor, this tree structure
of registry keys is shown (the registry editor is started with the command REGEDIT
in the run/search field of the Start Menu).
The following five registry keys are the basic registry keys:
Actually, there are only two registry keys (HKLM en HKU) because the other registry keys are sub keys of these two keys.
Registry values (string-, DWORD-
and binary value)
Registry values can contain different types of data. The most important types of
registry values are:
TIP: The DWORD Value 0 and 1 mostly correspond to off and on respectively for the given option.
Bits, bytes, binary, decimal and hexadecimal values...Every bit has the value zero or one, therefore it is a binary value. Every byte
contains of 8 bits (8 values of zero and one), therefore there are 256 possible
values (28=2*2*2*2*2*2*2*2=256). These 256 possible values are
sufficient for displaying the different values of a String Value.
|
The storage location of the registry values
The registry values are stored in files which are loaded at the startup of
Windows and at the logon of a user account. The registry values with system
specific settings (HKLM), are stored in the folder
C:\WINDOWS\system32\config (the files like DEFAULT, SAM, SECURITY, SOFTWARE
and SYSTEM). This folder contains a number a copies for back-up purposes,
recognized by the added extension (like BAK or SAV). The user
account specific settings (HKCU) are stored in the file NTUSER.DAT in
the personal folder (XP: C:\Documents and Settings\loginname, Vista: C:\Users\loginname).
While using the computer, there are continues changes of the registry values. It is only a matter of time, but eventually the registry becomes clogged with orphaned or misplaced values. There will also be a lot of empty spaces within the registry file as well (which are the result of continuously adding and deleting values). After a cleanup and defragmentation of the registry, the computer should boot faster and have more valuable system resources available.
Defragmentation of the registry
By defragmenting the registry, the empty spaces within the registry files
are removed with a smaller registry and more valuable system resources available
as a result. On a new installation of Windows XP or Vista (after the
installation of updates and the installation of software), in general a 10%
smaller registry is possible. There are multiple tools available for
defragmenting the registry, like Free Registry Defrag (download:
www.registry-clean.net/free-registry-defrag.htm) or Auslogics Registry
Defrag (download:
www.auslogics.com/en/software/registry-defrag/, registration is not needed). After analyzing the registry, a window
shows what the result of defragmenting the registry will be.
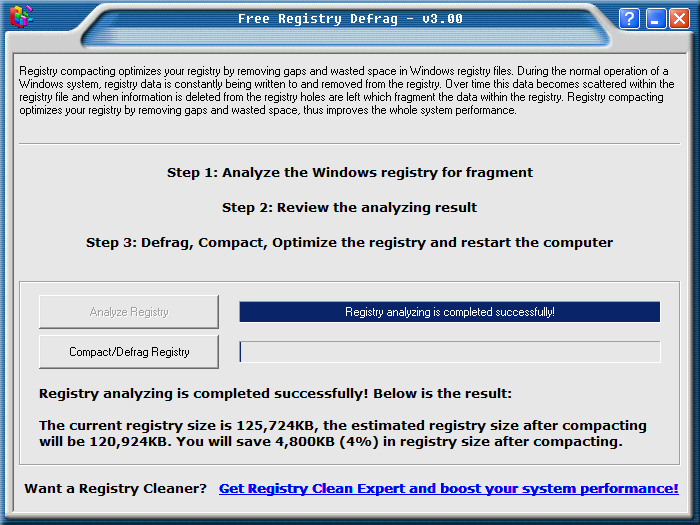
ATTENTION: After half a year, there is only a 3% of defragmentation of the Windows 7 registry. Therefore it is questionable whether it is useful to defrag the Windows 7 registry.
Cleaning the registry
It is a matter of time before the registry
gets clogged with
orphaned and misplaced registry values. It is frequently advised to clean up the
registry now and then. As a result, many clean up their registry, motivated by
all the useless items found at every cleanup. However, most cleaning tools are
not without risk: cleaning tools all claim they do a better job then other
cleaning tools, which in the end results in more (mostly hidden) problems. They
only give the user a good feeling while a faster computer is rarely the case. If
you encounter strange problems be warned that this can be caused by a previously
used cleaning tool!
TIP: If a system image is available, it is better to restore Windows (the registry included) in stead of using a cleaning tool.
The registry is frequently read or written to, these registry changes are essential for the well functioning of the operating system and other programs. When irreversible changes are made, there is a chance of big troubles (like not able to boot anymore). That's the reason that most magazines and websites (like this one...) place a disclaimer and warn that manually changing the registry is at your own risk.
Why these warnings? It is very difficult to restore a deleted (or changed) registry value to the original value, especially if there is no back-up available. Keeping these warnings in mind, the actual risks are exaggerated. As long as there are no unintended changes to registry keys and values, there won't be large troubles at all (with some exceptions...). Most keys and values can be deleted without getting into any problems (if needed they are recreated by the application which uses them). Always be careful and always work cautious!
Create a backup of the registry first
To be sure, create a backup of the registry keys to be changed first. If
there are any problems, there is a back-up available to undo the changes and to
restore the original settings. Creating a backup of the registry values in a
specific registry key is done by selecting the registry key (in the registry
editor) followed by File,
Export. The registry values
are stored in a file with the extension .REG, which can be read with a
simple text editor like Notepad.
Importing the REG-file into the registry is similar to exporting them
with the option Import or
by double clicking the file in the Windows Explorer.
TIP: The tool WinRescue (download: www.superwin.com) creates a backup of the whole register. To my opinion, restoring a system image of a problem free Windows installation is a better alternative.
Changing and/or adding registry values
Registry values are navigated to by the hive structure of the registry keys (in
the left pane of the registry editor). Registry values can be changed after
double clicking them. Depending on the type (string, DWORD, Binary,...)
the accompanying window is opened and the registry value can be changed.
Creating a new, non existing registry value is easy as well. Right click in an empty area of the right pane and select New (or by the menu bar Edit, New), followed by the desired type of registry value. Give the new registry value a name (the name can be changed later on by File, Rename). The actual value can be changed/added by double clicking the newly created registry value.
Searching the registry
Because the registry contains many registry values, it is impracticable to
search for a specific value. However, registry values are quickly found with the
search function (Edit, Search or the key combination CTRL-F). The
key F3 will continue the search function after the first value has been
found.
Finding out the purpose of a registry key or registry value
Browse the registry keys values and try to find out what they are for. In
many cases it is not that difficult to find out what a registry value is used
for (most values can be found somewhere on the internet). For example, the
registry key HKCU\Software is used to store the settings of software (for
the specific user account). In this key you will find the names of manufactures
from previously installed software (Microsoft is mentioned as well).
Only a few registry keys are interesting to apply registry tweaks, here are some of them:
TIP: The registry editor remembers the
last visited registry key, to open it the next time the registry editor is
started. Favorites is a
useful option to save the frequently used registry keys to get quick access
later on. By the way, the list of registry favorites is stored in the registry
as well, in the following registry key:
HKCU\Software\Microsoft\Windows\CurrentVersion\Applets\Regedit\Favorites)
TIP: This website has multiple registry tweaks available to apply different Windows XP settings (for Windows Vista there is not such page yet because most tweaks can be done with the user interface).
Permissions
Changing the permissions (Full
Control,
Read
or
Special permissions) is
simple and similar to the way it is done in the Windows Explorer by right
clicking a registry key, option
Permissions. Specific permissions can be added to registry keys to
make sure that other users are not able to change the underlying registry values.
Especially for accounts with limited permissions, changing the permissions to
full control to a specific registry key can be a practical solution for some
problems (especially if it is not desirable to change the user account to an
administrator account). The only problem is to find the registry key which needs
the additional permissions...
How to work with registry files
For backup purposes, registry values can be stored in a registry file with
the extension .REG. A simple text editor like
Notepad can be used to view
and change the content of those files. Because these registry settings can be
applied to any computer, changing those files can be very useful.
Many registry tweaks are documented on the internet and can be copied directly into a registry file. The example below shows the content of a registry file for adding the search engine www.google.nl as default search engine to the search field of the Internet Explorer 7.
Windows Registry Editor Version 5.00
[HKEY_CURRENT_USER\Software\Microsoft\Internet Explorer\SearchScopes\{A7BE0BEF-CE81-4E77-86E9-1A0C920C8E19}]
"DisplayName"="Google NL"
"URL"="http://www.google.nl/search?hl=nl&q={searchTerms}&meta="
[HKEY_CURRENT_USER\Software\Microsoft\Internet Explorer\SearchScopes]
"DefaultScope"="{A7BE0BEF-CE81-4E77-86E9-1A0C920C8E19}"
"Version"=dword:00000001
All registry files begin with a specific line to indicate that the file contains registry settings. Registry keys are placed between square brackets ("[" and "]"). The lines below the registry keys show the registry values to be added or changed (in this example most of them are String Values and one is a DWORD Value). Be aware that every key and value are placed on a single row!
TIP: Registry keys and values can be deleted with a registry file as well. By placing a minus sign behind the bracket ([-HKEY...) a whole registry key is deleted (all sub keys and registry values included). Specific registry values are deleted by placing a minus sign as value (e.g.: "DisplayName"=-).
Copy the above text to an empty file in Notepad and save the file with the extension .REG (e.g. google.reg). By double clicking this file in the Windows Explorer, the registry settings are added to the registry (the changes are definitive). When the values already exists in the registry, they are overwritten by the values in the file. Because the registry keys start with HKEY_CURRENT_USER (the key for the account specific settings), the registry file must be applied within every user account. When the registry file is saved, it can be applied on multiple user accounts and computers later on.
TIP: A register file is added to the registry by double clicking it in the Windows Explorer. This method has the disadvantage of two additional clicks are necessary for approval. This is not necessary when a batch file is used (e.g. google.bat) to suppress these approvals. Open a new text file in the text editor, enter the following command and save the file with the extension .BAT (google.reg is the earlier created registry file):
REGEDIT.EXE /s google.reg
Almost all Windows, program and hardware settings are stored in the registry, which can be changed manually. These changes can be stored in a registry file and applied by double clicking this file (in stead of a manual change). This procedure is especially usefull when settings have to be applied on multiple computers.
The only problem is to find the right registry value to change for a specific setting because it is not always that clear where specific settings are stored. To find the registry value there are four methods (the first two al discussed already):
Tracking registry changes based on registry snapshots
This method (comparing of snapshots) is very time consuming. For this purpose it
is necessary to create two full snapshots of the registry: one before and one
after the change. The next step is to compare the two snapshot with a time
consuming calculation of the differences. It is a smart and useful procedure
for tracking multiple registry changes. Both the tool Advanced Registry Tracer (download:
www.elcomsoft.com)
and Tracker
(download: www.evans-programming.com)
follow this procedure (and both are available as a 30 day trial version).
Real-time monitoring of registry changes
Real-time monitoring of the registry has the advantage of immediately displaying
the changes to the registry, which makes it less time consuming. The most
useful tool for this purpose is Process Monitor from Sysinternals (download:
http://technet.microsoft.com/nl-nl/sysinternals/bb896645(en-us).aspx). Process Monitor is a advanced tool for real-time monitoring
changes to the registry, the file system and the running processes.
After Process Monitor is started, the registry changes are flying over the screen (it is real-time...). The first time you see this, it can be quite overwhelming to see what's going on. Because this tool monitors both registry settings, changes to the file system and the running processes the shown changes are enormous. By using a filter, the continuous flow of changes can be limited to the most important. In the example below the number of events has been brought back from 19.000 (in one single second!) to only 17.
By clicking the button Capture Events (button 1 or CTRL-E), the real-time monitoring is started and stopped. The adjacent button Auto Scroll (button 2 or CTRL-A) stops and starts the automatic scrolling. The already shown events can be cleared with the button Clear Display (button 3 or CTRL-X) to be able to start with an empty screen. Follow the next 3 steps to quickly find the desired registry changes:
Step 1: Limit the monitoring to registry changes
Even within a short scanning period, there are too many events to find a
specific registry value quickly. For this reason, it is necessary to apply a
filter to limit the number of shown events.
The first step is deactivating the options Show File System Activity and
Show Process and Thread Activity (button 5 and 6). After this filtering,
the shown events are limited to the registry events (like the adding, changing
and deleting of registry values and registry keys, but also the querying,
opening, searching and closing of registry keys/values).
Step 2: Filter the irrelevant events
The next step is to eliminate the irrelevant registry events from the monitoring
results, which is done with the button Filter (button 4 or CTRL-L).
To realize this, add the following filter rules (add them separately with the
buttons Add and Apply):
Operation is RegOpenKey then Exclude
Operation is RegCloseKey then Exclude
Operation is RegQueryKey then Exclude
Operation is RegQueryValue then Exclude
Operation is RegEnumKey then Exclude
Operation is RegEnumValue then Exclude
These filter rules concern the opening, searching, querying and closing of registry keys and values. Adding these filter rules is quite time consuming, fortunately these rules can be added easily by right clicking an event and to select Exclude, option Operation. Based on the characteristics of a single event, all similar events will be deleted.
Step 3: Show the registry values in the registry editor
When the registry value has been found, it's location can be opened
automatically in the registry editor by right clicking the event in the Process Monitor
and select Jump To. Within the registry editor, the registry key/value
can be exported easily to a registry file.
TIP: By Options, Enable Boot Logging the changes to the registry and file system can be traced during the startup of Windows.
TIP: Right click an event in the Process Monitor and select Stack to find out which processes and threads change the specific registry value. The value in column PID stands for Process ID. This PID can be used to trace the responsible process in the Windows Task Manager (CTRL-SHIFT-ESC) or the Process Explorer (from Sysinternals as well).
© 2001-2022 - Menno Schoone - SchoonePC - Rotterdam - The Netherlands