The setup procedure of Windows Vista is easy. After booting the computer from the bootable DVD, you are asked for confirmation to boot from the Windows Vista DVD. For an upgrade to Windows Vista, the setup can also be run in a Windows XP environment (an upgrade installation). Windows Vista will be installed next to the current XP installation (before starting this procedure, remove the currently installed security software!). After the setup of Windows Vista has completed, programs, settings and personal data will be transferred automatically to the new operating system and the old system files will be moved to the folder Windows.old.
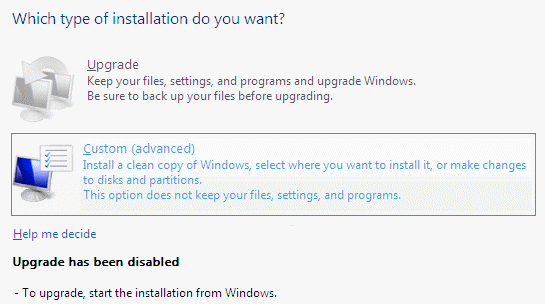
A clean installation is the best option!
An upgrade installation will probably run without any problems, but it's not
the best way to install Windows Vista. An upgrade installation can possibly
result in installation errors, a clean install (where Windows Vista is installed
on an empty C: partition) probably won't. That's one of the reasons why a clean
installation is preferred above an upgrade installation.
Multiboot system
For realizing a multiboot system, it
is
necessary to create multiple primary partitions, one for each operating system (in combination
with a boot manager). Make sure you created a back-up of your personal data, hide the currently
installed operating systems and remove an earlier installed boot manager before
starting the setup of Windows Vista .
WHAT IF THE COMPUTER DOESN'T BOOT FROM DVD...If it's 'not possible' to boot the computer from the Windows Vista DVD, the boot order has to be changed in the BIOS (in most cases the DEL or F2 key must be pressed while booting the computer, to get access to the BIOS). Look for something like boot order or boot sequence. Change the boot order and make sure the DVD player will be the first boot device (before the hard disk does). If the setup has finished, the boot order can be restored to the previous settings. |
|
|
CHOOSING BETWEEN A 32- OR 64-BIT INSTALLATIONWindows Vista can be installed in both 32-bit (like Windows XP) and 64-bit. The 64-bit version should be more stable (and faster) because this version only allows the installation of 64-bit drivers which are signed by Microsoft. However, in practice, 64-bit version is not more stable in comparison to the 32-bit version. Besides, many drivers are not available and signed (yet) for the 64-bit version. Only choose for the 64-bit version if you are sure 64-bits drivers are available for your hardware and your software works error free. You will only know if this is true, just by trial and error (by setting up a multiboot system with the 32-bit and 64-bit you are able to compare the advantages and disadvantages of both versions). Attention: the older 16-bit software can't be used anymore in the 64-bit version! |
At setup, Windows Vista will try to install all the drivers of the connected hardware. Because many devices need to be installed separately, it is wise to disconnect the hardware before starting the setup procedure. The problems caused by installing hardware drivers are easier to back trace, if they are installed separately. After the setup has finished, reconnect the hardware one by one and install the accompanying drivers and software.
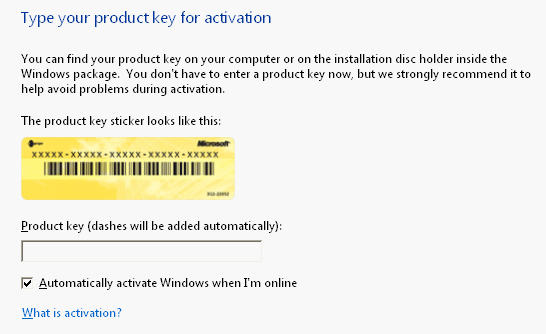
At the beginning of the setup procedure, the product key must be entered. The option Automatically activate Windows when I'm online is activated by default. Deactivate this option, if an immediate product activation is not desired after the internet connection has been established (for example if there is any doubt about the hardware compatibility, in that case Vista still can be installed on a different computer). The Windows Vista DVD makes it possible to install all versions; the definite version is determined by the used product key. If the screen with the requested product key has been skipped, the setup asks which Vista version should be installed. This procedure makes it possible to try one of the other versions for some time. Make sure you select the right version if Vista will be activated eventually.
At a certain point in the setup procedure, you are asked which partition to use for the Windows Vista installation. The C: partition is the most appropriate for this purpose. If there are no partitions yet, the hard disk needs to be partitioned first. To achieve this, click the link Drive options (advanced) to create new partitions. If you notice Windows Vista will be installed on a partition with a different disk letter (not C:), abort the setup and try again. This behavior happens after Windows is installed on a non-partitioned hard disk where the DVD player has been assigned the disk letter C: first. Restarting the setup is important to make sure Windows is installed on a C: partition.
Creating a new User account
At the end of the setup, you are asked for a name for the user account (the
password is optional). Only fill in one of the user accounts and setup this
account as wished. Afterwards, the settings of the optimized account can be
copied to a newly created account (Control Panel, User Accounts). At the first logon, an introduction screen
(Welcome Center) is shown, which is also available through the Control Panel. Disable the
introduction screen with the option Run at startup (at the left bottom of the screen),
if the Welcome Center is no longer needed. The next step is to optimize the settings of the user account, like
changing the
settings of the desktop, start menu, quick launch en the sidebar. See also
the page about setting up
multipe user accounts.
WORKAROUND FOR THE LIMITATIONS OF A VISTA UPGRADE-DVDThe installation procedure of a Windows Vista Upgrade-DVD has been changed in comparison to the former Windows upgrade procedures. During the upgrade procedure, the setup searches automatically for an activated and validated Windows XP-installation (this is not the case for the Express Upgrade-DVD). Before you can proceed the setup of Windows Vista, the older Windows XP must be installed, activated and validated. A 'clean' install can not be done anymore with the Windows Vista Upgrade-DVD following the standard procedure! Fortunately, there is a workaround to achieve a clean installation. This is possible by running the setup of the Windows Vista Upgrade-DVD and installing Vista on an empty partition. Skip the question about the product key and deactivate the option Automatically activate Windows when I'm onlin in the following screen. Confirm that a product key is not necessary and select the bought Windows Vista version in the next screen. After the installation has been finished, the setup procedure must be run for the second time, but in this case by booting the DVD from within the newly installed Windows Vista. Choose for the Custom setup instead of an Upgrade setup and don’t forget to enter the product key when asked for. The files of the old installation are stored in the folder Windows.old that can be deleted afterwards. |
WHAT IF THE HARD DISK IS NOT RECOGNIZED?During the setup procedure, you are asked on which partition to install Windows Vista. If there is no partition to choose from, possibly the hard disk is not recognized by Windows. The most common cause is a SATA controller or RAID configuration (a combination of two or more hard disks working together to achieve a faster and/or more reliable system) which isn’t supported by Windows yet. This problem can be solved by loading the missing drivers (at the moment when is asked for which partition to install Windows on) with the option Load Driver from disk, CD or USB memory stick. The hardware drivers needed for the controller are stored on the CD with drivers and software for the motherboard. For better support, download the newest drivers from the website of the motherboard manufacturer (see the page about installing hardware drivers). TIP: Some motherboards has a feature to load a SATA hard disk as an IDE hard disk. Search the BIOS settings for an option like Native SATA support/AHCI (Advanced Host Controller Interface), and disable it. Although this setting works fine, it is better to install the original drivers for the SATA controller afterwards followed by restoring this setting. |
PRIVATE OR PUBLIC LOCATION TYPEAt some point during the Windows Vista setup, you are asked on what type of network the computer is attached to: Private or Public. If the computer is in a home or work situation, Private would be the most obvious options to choose. However, if the advantages of a network like sharing files and printers are not used at all, choosing for Public as location type is probably the best option to choose because this results in a better secured computer. The chosen option can be changed afterwards with the link Customize in the Network and Sharing Centre. |
DELAYING THE WINDOWS VISTA ACTIVATION FOR 4 MONTHSWithout product activation, Windows Vista can be used for 30 days, after this period the operating system switches to a modus with reduced functionality (RFM). The command SLMGR -rearm makes it possible to extend this period three times with 30 days. To achieve this, run the Command Prompt (Start menu, All Programs, Accessories) in administrator modus by right clicking on the shortcut and choosing for Run as administrator. Following this procedure, the allowed period can be maximized to four months. The command SLMGR shows the other options of the Windows Software Licensing Management Tool, like changing/removing the current product key and showing the current licence information. |
CLASSIC VIEW OF THE CONTROL PANELThe remaining part of this website assumes that the Controle Panel is used is Classic View (available in the left task pane of the Control Panel). |
CHANGING THE DEFAULT WINDOWS EXPLORER SETTINGSThe system files are hidden by default, which is fine for less experienced users. However, some of the changes mentioned on this website assumes that both system and hidden files are made visible. This is done by changing the following settings on the tab View (available through the button Organize of the Windows Explorer, Folder and Search Options, see the page optimized Windows Vista settings as well):
|
Good news: most software available for Windows XP still works fine with Windows Vista; in many cases even an upgrade is not necessary. This is possible because of the symbolic links (comparable to shortcuts, introduced in Windows Vista) used to redirect to another location. The XP based software searches for the default locations, which are used by in the Windows XP operating system. The symbolic links forward the requests automatically to the new default location within Windows Vista. In case of the folder Documents and Settings (used by Windows XP to store the documents and settings of the user accounts) has been replaced by the folders Users en ProgramData. The programs which still use the old storage locations will be redirected by the symbolic links to the new locations. Besides that, the setup of the register hasn’t changed that much in comparison to the earlier Windows versions. That’s why many programs still work fine under Windows Vista.
User Account Control (UAC)
Many programs would like to change the
(system) settings, which is only possible when the user account has the right to
do so (like an administrator account). With Windows Vista the security level of
even the administrator accounts have been raised with User Account Control,
which requests for confirmation of any (essential) changes, if requested at all.
Some older software is not aware of this additional security layer, and produces
strange errors as a result. In most cases, you have to find out by trial and
error whether a program works without any problem under Windows Vista. For more
information about this issue, see the page about
Windows Vista software
compatibility.
Because User Account Control (UAC) restricts the rights of any program, each program individually must receive additional administrator rights to make the necessary changes to the system. These additional rights can be given at the start of the program (or setup file) by right clicking the program file or shortcut, and to select Run as administrator. Permanent administrator rights are given by right clicking the shortcut and select Properties, tab Shortcut, button Advanced, and activate the option Run as administrator.
© 2001-2022 - Menno Schoone - SchoonePC - Rotterdam - The Netherlands