Most information on this website is summarized in 10 steps to install and optimize Windows, where the first four steps are discussed on part I of the 10 steps. This page describes the remaining six steps where the emphasis lays on improving the usability. Many of the tips on this page can be applied immediately on an existing installation! To summarize, installing and optimizing contains the following 10 steps:
The operating system, the accompanying updates and the hardware drivers are installed, but the most time consuming part is still to come: changing the personal settings and optimizing Windows. By personalizing and optimizing the Windows system, the usability can improve significantly. But there are no simple procedures for optimizing the personal settings, most of them are applied in a couple of days/weeks while using Windows.
Optimizing the visual settings
One of the most important changes concern the visual settings. Change the
desktop resolution as preferred. When a flat screen is used, then the optimal
desktop resolution depends on the technical properties of the monitor. The next
step is to arrange the desktop shortcuts and to pin the favorite programs to the
Start Menu (right click a shortcut and select Pin to Start menu).
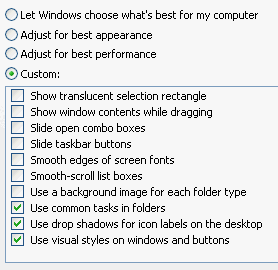
By disabling specific visual effects, the system performance can be improved (especially in case of the older computers). For many, the disabling of visual effects is not even noticed: reason enough to make some changes... Within Windows XP, disabling visual effects is done at the sub System in the Control Panel, tab Advanced, the Settings button in the Performance area, tab Visual Effects. For some of the visual effects, it is better to keep them enabled, as shown below:
|
|
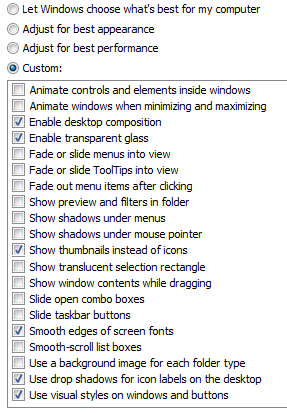
Within Windows Vista, disabling the visual settings is done at the sub System in the Control Panel, Advanced system settings (at the left in the task pane), tab Advanced, button Settings (as part of Performance). For some of the visual effects, it is better to keep them enabled, as shown below:
Disabling unneeded services and automatically started programs
The disabling of unneeded services and automatically started programs could
improve the system performances significantly. But this is not a simple
procedure, especially when there is a lack of experience. The pages about
disabling unneeded
Windows-services and started items
for Windows XP and the
Windows-services and started
items for Windows Vista give more extensive information about this subject.
The page about
disabling unwanted software gives additional information.
Changing the Windows settings
In the next step, the settings for the taskbar, power options, the Windows
Explorer, the
Internet Explorer and the mail program (like
Outlook Express,
Windows Mail or
Outlook) are optimized. The pages on this website describe these settings in
detail:
After Windows is installed, it is important to secure it with virus scan and firewall software. Many trust on a security suite from one of the big security vendors like McAfee, Norman, Norton, Panda or Kaspersky. These commercial security suites contain a total solution, which include virus scan software, a firewall, a spam filter, a pop-up blocker, anti-spyware, anti-hacker, anti-phishing, network security, parental control, a site advisor, anti-robbery, file encryption and probably many other features (from witch you can ask yourself whether you need them).
TIP: Before paying for commercial security software, check the service page of your internet provider! Some internet providers offer their customers commercial security software for free (my service provider offers McAfee for free).
Free security software as alternative
The commercial software has a disadvantage as well: they consume system
resources which delays the computer significantly.
The next question arises whether such software is useful! Because the free
alternatives consume less system resources, they can a good alternative. Keeping
in mind that all incoming mail is scanned for viruses by the provider (most
providers do), the risk of being infected by a viruses is reduced significantly.
Software firewall
The firewall controls the internet connection: the firewall blocks all incoming
traffic and allows outgoing traffic only when it is confirmed by the user. Both Windows XP and Windows Vista
their own firewall, but the features are limited and not user friendly (for
example they are not able to control the access of programs to the internet when
they ask for access to the internet). Fortunately there are free firewall
software available (like
Comodo and
ZoneAlarm) which are trustworthy and do offer these features.
Virus scan software and anti-spyware
To prevent the infection with a virus, it is important to secure the computer
with a virus scan software. For this purpose there are free software available
as well, likes
AVG,
Avast or
AntiVir. Visit the page about installing
free virus scan software for more information.
Besides virus scan software, frequently it is advised to install one or more anti-spyware tools as well, like Ad-Aware or Windows Defender. However, when Windows is reinstalled recently, such software is not a must, especially when an image of the Windows system is available. In case of an infection with spyware, it is better to restore an image in stead of walking through a time consuming scan for spyware. Restoring an image is less time consuming and gives a guarantee of a virus and spyware free Windows installation. Besides these advantages, the cleaning with anti spyware software cause more troubles (which occur in the future) then they normally solve!
Now Windows is installed, optimized and the security has been arranged, it is time to install additional software like an Office suite and the software accompanying the hardware like scanner software, printer software and picture editing software. In this phase, only install the software which will be used for sure and if needed update to the latest available version. The testing of additional software can be delayed until an image of the Windows installation is created in step 10, to be able to restore a properly working Windows.
Interesting free software to install
There are lots of interesting (free!) software/tools available. The list below
shows a list of the best free software (most of them are discussed elsewhere on
this site):
The next step is for restoring the personal files to the storage locations of the newly created user account. Like mentioned previously, it is wise to separate the personal files and the files of the operating system which is done by using multiple partitions (where one of them is used to store the personal files). When the personal files are stored on a different location, the default storage locations be changed to point to these locations.
Changing the default storage location (Windows XP)
The default storage location of the folder
My Documents (and the underlying folders My Pictures,
My Music,
My
Videos, ...) is easily changed by right clicking the My Documents
shortcut in the Start menu and to select Properties. Use the tab
Target, button Move to change the default storage location into the
new personal folder, stored on the data partition, like D:\loginname.
The storage location of Outlook Express is changed in the program itself by Tools, Options, tab Maintenance, button Store Folder. The necessary registry change for changing the storage location of the Windows Address Book (the WAB file) is done easily with the tool OE Tweaker (download: http://downloads.pcworld.com/pub/new/internet/ e_mail/QWOeTweakerInstall101.exe). Preceding the registry change, the WAB file has to be moved with the Windows Explorer to the new location. The Internet Explorer Favorites folder (C:\Documents and Settings\loginname\Favorites) is easily moved within the Windows Explorer by cutting (CTRL-X) and pasting it (CTRL-V) on the preferred location (e.g. as sub folder of the My Documents folder). Moving the RSS-feeds is almost impossible within Windows XP.
Changing the default storage location (Windows Vista)
Within Windows Vista, changing the default locations is somewhat different.
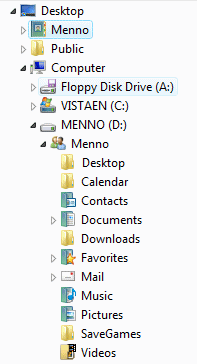
Moving the folder Documents is done by creating a special for the
specific user, for example D:\loginname (in
the example below it is named
D:\Menno). Within this folder create a folder with the name Documents
using the Windows Explorer to store the documents in (D:\loginname\Documents),
the future storage location of the personal documents. Create folders for
Desktop, Contacts, Downloads, Favorites, Music, Pictures,
Videos and SaveGames as well.
Now it is time to change the default storage locations of the created folders. The folder C:\Users\loginname contains the subfolder Documents, right click it and select Properties, tab Location. Click the button Move, navigate to the folder D:\loginname\Documents and apply the changes. Moving the other folders (content included) is similar. Always select the created folder and never a partition because a chosen partition is hard to change back.
TIP: Although changing the storage location is officially done with the tab Location, but there is a more efficient way: just cut and paste them into the desired location within the Windows Explorer. With this method, all folders can be moved at once. The remaining, yellow colored folders on the original location of the C: partition can be deleted safely.
The Windows Mail storage location is changed in the program itself by Tools, Options, tab Advanced, button Maintenance, button Store Folder, button Change (for example D:\loginname\Mail, use the button Make New Folder). The page about Windows Mail also describes how the Windows Calendar database is changed with the command MKLINK. This command is also useful for moving the Internet Explorer RSS-feeds to a different location.
ATTENTION: Although a user account has administrator rights, it will not prevent the occurring of problems with the permissions! For example, the Internet Explorer can show an error message when a website is added to the favorites. This problem is solved permanently by giving the user account Full control over the folder D:\loginname. For more information about changing the permissions to full control, visit the page about user accounts in Windows Vista (sub Change permissions of the personal folder to Full Control).
MOVING THE OUTLOOK DATABASE AND ARCHIVE FILEChanging the storage location of the database of the email program Outlook is done by moving the OUTLOOK.PST file with the Windows Explorer to the D: partition. After moving the file, start Outlook, accept the error message and browse to the new location of the OUTLOOK.PST file. When the automatic archiving is on (by default), the ARCHIVE.PST file must be moved as well. The page about Outlook describes in more detail how this is done. This page also describes how to solve the problems with the contacts which occurs when the OUTLOOK.PST file is replaced by one of an older installation. |
When there are no problems to solve any more and all software works is installed and working properly, it is time to delete all unneeded files (like the files for Windows Update and the temporary internet files). When the unneeded files are deleted (with the Windows Explorer), it is wise to defrag the hard disk. The page about disk cleanup (Windows XP) describes which files can be deleted safely, while the page about disk defragmentation (Windows XP) describes the defragmentation process. For Windows Vista, this information is available on the page disk cleanup and defragmentation.
In steps 1 to 9, Windows is installed and optimized. Because this takes a lot of time (even for a pro). It would be nice to save all this hard work, just in case something strange happens to the Windows installation which results in an insolvable problem. Those kind of problems can't be prevented, but it is possible to make an image of the current installation which can be restored in case those problems occur. Restoring the image will result in a fully optimized Windows, free of viruses. Of course, the Windows build in system restore function can be used as well but this feature follows Murphy's law: it doesn't work anymore when you need it most! This shows the biggest advantage of an image of your system: it always works and always gives the same result!
For imaging the Windows partition, it is not necessary to use commercial software because there are free alternatives like Partition Saving (download: www.partition-saving.com). Although it is advised to use a special (FAT32) backup partition for this purpose, it is not necessary. The image of the system partition can also be stored on an external hard disk (connected with an USB cable) as well. With this setup, all computers can be imaged! How this is done (and the problems that can occur) is described on the page about creating an image of the Windows system.
TIP: When a new hard disk is used to install Windows on, the old hard disk (internal or placed in an USB case) can be used for saving the image files.
Contrary to what is thought frequently, installing Windows is not that difficult. It only costs a lot of time, which can be a reason to keep postponing it... When a reinstalling of Windows is thought of, it is wise to plan some time for it to make sure it is done properly the first time. Doing it all over again would be a real waste of time... For this purpose, the 10 steps for installing and optimizing Windows can be very useful!
On the page with the first four steps, probably the most important advise was to install Windows on a new hard disk. This results in a quick installation while the personal data are kept safe. Afterwards, the personal files can be transferred easily from the old hard disk to the new one by connecting it temporarily as second hard disk. If the installation of Windows runs into problems, it is still possible to reconnect the old hard disk to start the old Windows from.
The most important advise on this page is the separating of the personal files from the Windows operating system (programs included) on the C: partition. This is done by moving the personal files to a D: partition. By doing so, it is even easier to backup the personal files and to image the Windows partition (which can be restored without loosing data!) as well. Installing Windows according to these 10 steps is a one time investment with a long term profit!
Installing and optimizing Windows in 10 steps part I
© 2001-2022 - Menno Schoone - SchoonePC - Rotterdam - The Netherlands